
Being able to create a bootable USB installer for macOS is a useful skill for any Mac user. Whether you’re performing a clean install, setting up multiple Macs, recovering a system that won’t boot, or simply want a reliable offline installer, a bootable USB drive gives you far more control than relying on macOS Recovery alone.
While it’s easier to create bootable installers than it was in the past thanks to the Terminal command createinstallmedia, but the process isn’t obvious – and differs depending on whether you’ve using an Intel Mac or a Mac with Apple silicon. You’ll need the right macOS installer, a USB drive that’s big enough and a few Terminal commands that you need to type exactly right.
In this guide, we’ll walk you through creating a bootable macOS USB installer, covering the latest versions of macOS as well as older ones. We’ll explain what you need before you begin, how the process is different for Intel and Apple silicon Macs and how to use your installer once it’s ready. By the end, you’ll have a reusable macOS installer that can save you time, bandwidth and frustration – and it might even save your Mac when nothing else will.
PROMOTION
Create a bootable installer on Mac FREE

EaseUS Data Recovery Wizard for Mac is not only a hard drive recovery tool on macOS devices but also a bootable installer creator. Just with a click, it clones the boot disk to create a bootable USB and gets your macOS updated or boot from the installer. Also this bootable disk manager helps to install macOS, perform system repairs, or even reinstall the operating system on the go.
If you want to find out how to make a bootable install of the latest macOS beta, macOS Tahoe, macOS Sequoia, macOS Sonoma, macOS Ventura, macOS Monterey, Big Sur, Catalina, Mojave, or an older version of Mac OS X or macOS, you’ve come to the right place.
Why create a bootable USB mac installer
Creating a bootable USB macOS installer is a versatile tool for troubleshooting, system maintenance, and managing multiple computers.
There are several specific scenarios where a bootable USB is superior to standard software updates or built-in Recovery modes:
- Clean Installations and Troubleshooting: A bootable drive allows you to wipe a Mac’s internal storage and install a fresh copy of the operating system. This is often the best way to fix persistent software issues, remove potential viruses, or prepare a machine for a new owner. See: How to do a clean install of macOS
- Installing on Multiple Macs: Instead of downloading the multi-gigabyte installer (which can be 16GB or more) on every individual machine, you can download it once and use the USB to update several Macs quickly.
- Installing on a separate volume: You can also use your bootable installer to install macOS on a separate volume of your hard drive.
- Installing the latest macOS beta
- Downgrading macOS: If a new update like macOS Tahoe causes issues, a bootable installer is the primary method for rolling back to a previous version like macOS Sequoia or Sonoma. See: How to get older versions of macOS.
- Unsupported Hardware: For users with older Intel-based Macs that Apple no longer officially supports, a bootable USB is required to use tools like the OpenCore Legacy Patcher to install newer versions of macOS.
- Emergency Access: If your Mac can’t access Recovery mode.
| Speed | Faster than downloading the OS via Recovery mode for every install. |
| Offline Use | Allows for OS reinstallation without an active internet connection. |
| Versatility | Supports clean installs, downgrades, and patching unsupported Macs. |
| Efficiency | One drive can update an entire fleet of Mac computers. |
How to create a bootable macOS Installer
We will run through the following steps to create a bootable USB for Mac:
- Get the macOS installer files
- Create a bootable installer for macOS
- Choose the correct createinstallmedia command
What you need to make a bootable USB for Mac
- A 32GB Flash Drive (Minimum): To create a bootable USB installer, you typically need a USB flash drive or Thunderbolt drive with at least 32GB of space. Using a faster drive, such as a USB 3.0 or USB-C stick, is recommended to reduce installation times. For modern M-series Macs, a Thunderbolt drive may be more reliable due to known compatibility issues with some standard USB drives and older M-series Macs.
- Note: If you have data on the drive that you plan to use you will need to transfer it to another drive, as it will be completely formatted and erased.
- macOS installation files: You can obtain these from the Mac App Store, Software Update in System Settings, or other official Apple sources.
- A Compatible Mac: The standard createinstallmedia method requires a Mac running OS X 10.7 Lion or later.
- Admin access: You will need to have an admin user account on the Mac you are working with.
- Internet access: It goes without saying that you will need an internet connection to download the software and you may need it while installing the version of macOS if it needs to check for firmware or confirm your iCloud credentials.
Get the macOS installer files
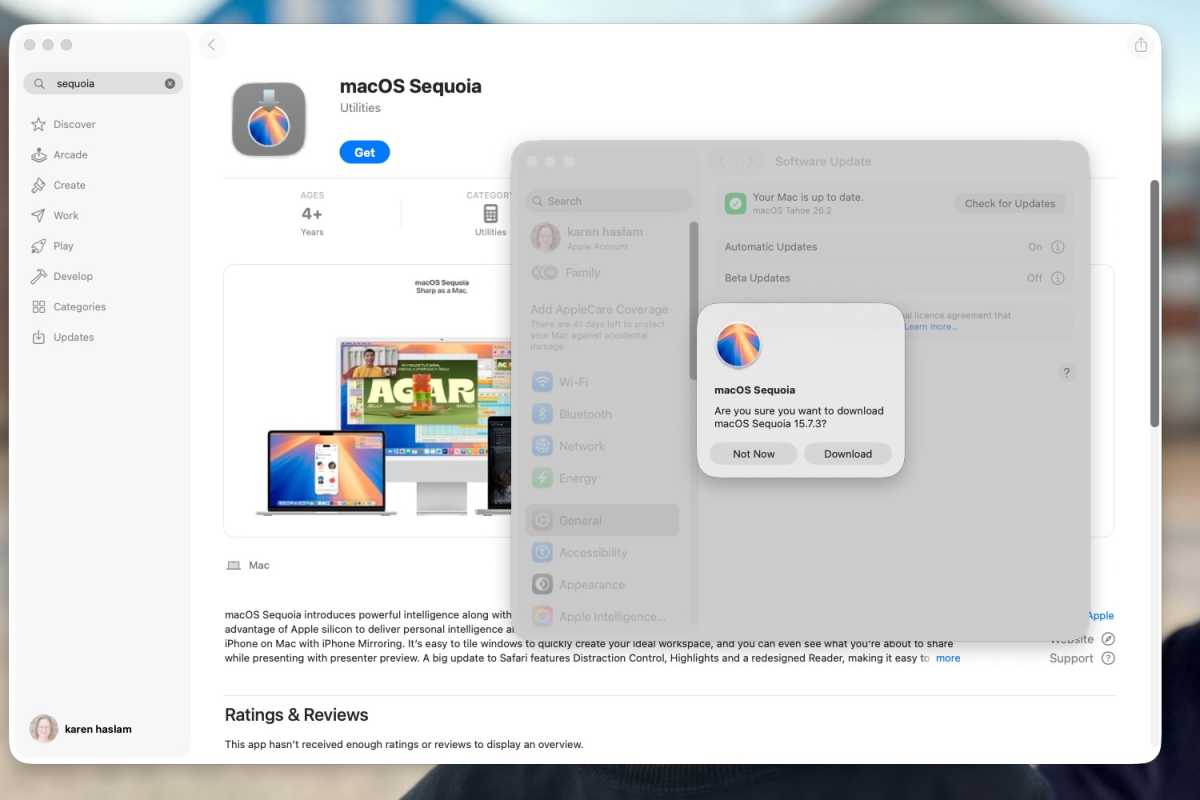
You can get installers from the Mac App Store – as long as your Mac is compatible.
Foundry
How you get the installation files will depend on the version you want the installer for. Below we’ll look at how to get various macOS installers. If it’s an older version you are after, we have a dedicated article about How to download old Mac OS X and macOS versions.
- Warning: Download the installation files, but make sure you stop before the actual installation starts. When the installation starts the files will be disposed of, so you need to step in beforehand!
Where to get macOS Tahoe installer: macOS Tahoe can be downloaded on compatible Macs through the Software Update mechanism within macOS. Navigate to the Apple menu > System Settings > General > Software Update. Your Mac will check for the latest version, and you can click Upgrade Now to begin the download.
Where to get the macOS beta: To get the latest beta files you need to first register for the Apple’s official developer or public beta programs. You can then download the latest beta from Software Update, as described above. See: Latest macOS beta details and how to get it.
Where to get macOS Sequoia installer: macOS Sequoia can be found on the Mac App Store.
Where to get other macOS installers: You can download the installers from these Mac App Store links. Make sure you use Safari and close the Mac App Store before clicking on the link or it may not work. If your Mac is too new it may not be compatible with these older versions.
- macOS Sonoma
- macOS Ventura
- macOS Monterey
- macOS Big Sur
- macOS Catalina
- macOS Mojave
- macOS High Sierra
Once the installation files are downloaded you will be able to find them in the Applications folder via the Finder. Now you have the installation files, we can move on to the process of making the bootable installer.
Creating a bootable installation of macOS requires a single command in Terminal (this has been the case since Mavericks arrived in 2013). The createinstallmedia command makes it possible to create a bootable copy of an installer on any drive that’s connected to your Mac. You’ll find all the createinstallmedia commands below.
- Warning: The createinstallmedia command erases anything on your external disk though, so make sure there’s nothing on it that you need.
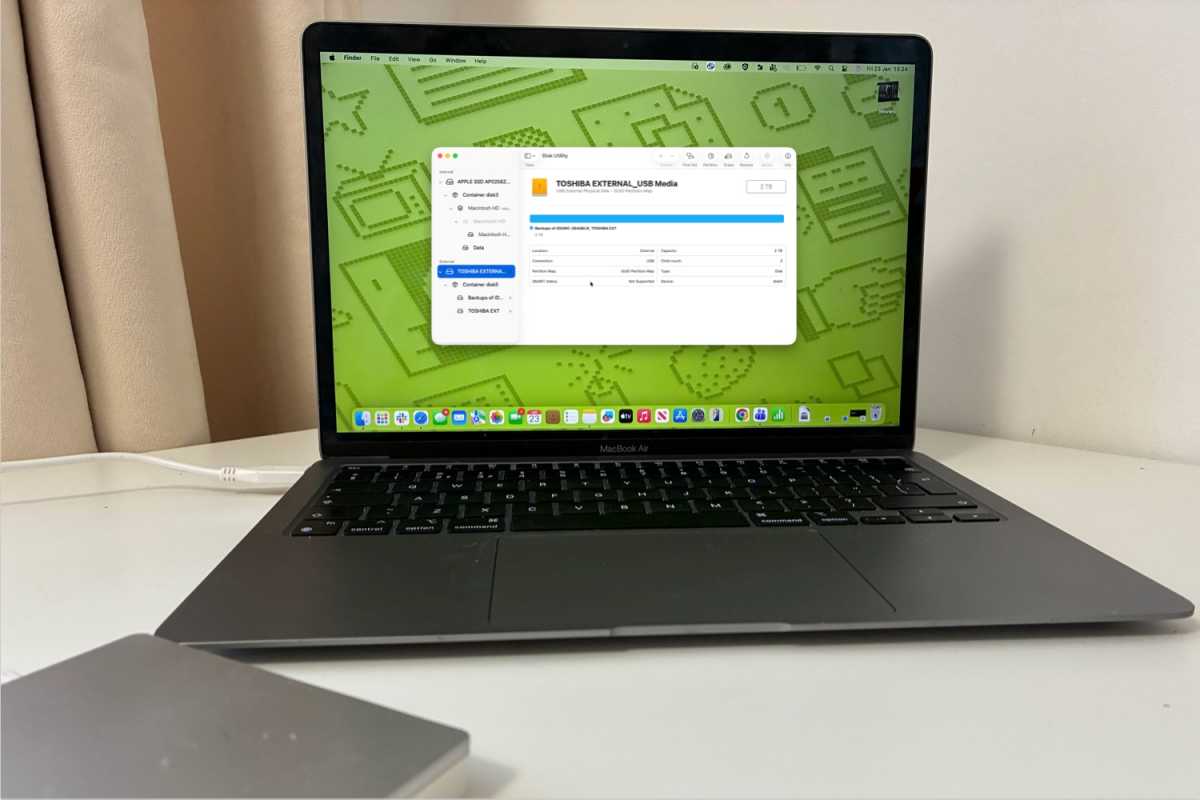
Connect and prepare the drive
Using Disk Utility to prepare the hard drive.
Foundry
- Plug in an external drive with at least 32GB space (recommended for newer macOS versions).
- Open Disk Utility (press Command + spacebar and start to type Disk Utility).
- Click View and select Show All Devices.
- From the sidebar, select the root drive
Erase and format the drive

You will need to erase the disk.
Foundry
- Click Erase.
- Set the following options:
- Name: MyVolume (You can choose another name, but you’ll need to use it exactly later.)
- Format: macOS Big Sur or later: APFS (In macOS Catalina or earlier use Mac OS Extended (Journaled))
- Scheme: GUID Partition Map
- Click Erase.
- Wait for Disk Utility to finish, then click Done.
Create the bootable installer
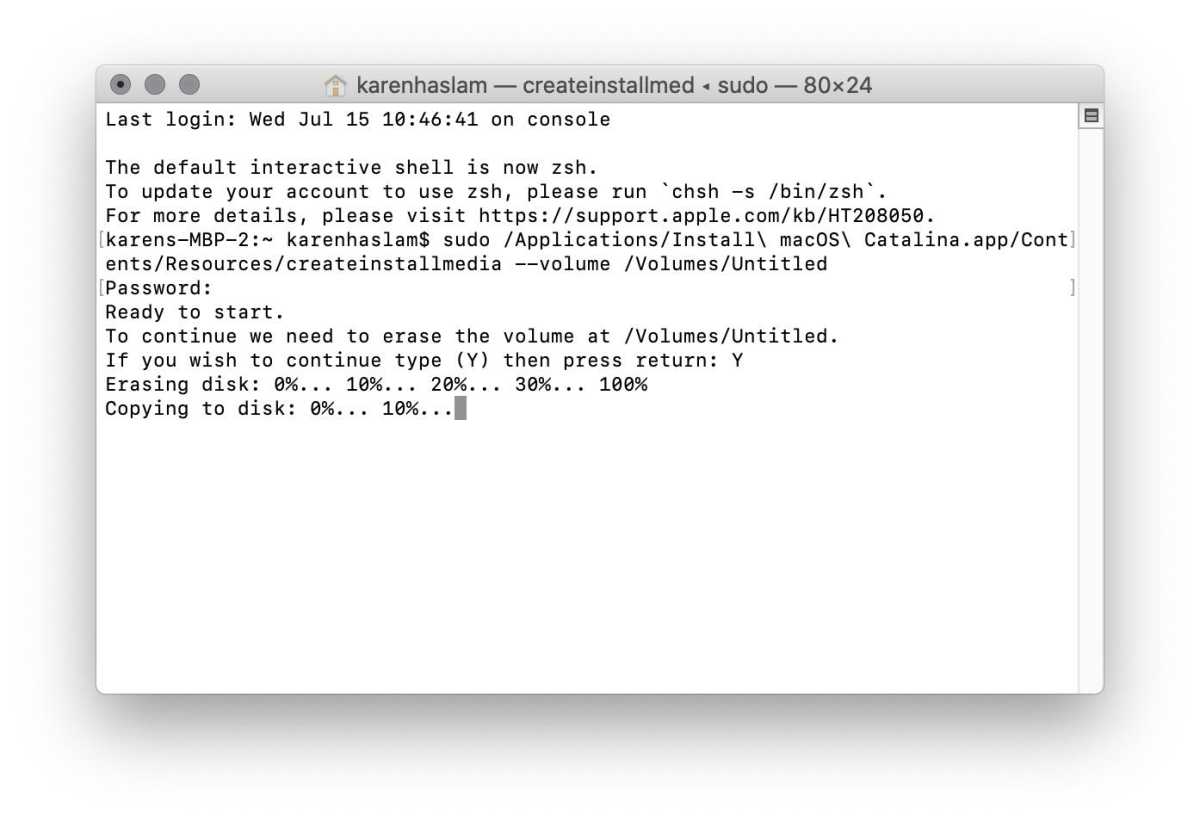
Foundry
- Open Terminal (Command + Space → type Terminal).
- Enter the createinstallmedia command for the version of macOS you’re installing. (You can find the one for the macOS version you want listed below).
- Press Return.
- Enter your user password when prompted (you won’t see characters appear).
- If asked to allow access to the removable drive, click OK.
- When warned that the drive will be erased, type Y and press Return.
Wait for the process to complete

Expect it to take a little while.
Foundry
Terminal will erase the drive, then copy the installer files. This may take several minutes.
When finished, you’ll see: “Copy complete. Done.”
Your bootable installer is now ready.
How to boot from the installer
Foundry
Now you have the installer on the external drive you can use that to install copies of macOS on multiple Macs (as long as the Macs are supported by that version).
- Note: With M-series Macs the way you boot from the installer is different to older Intel-based Macs.
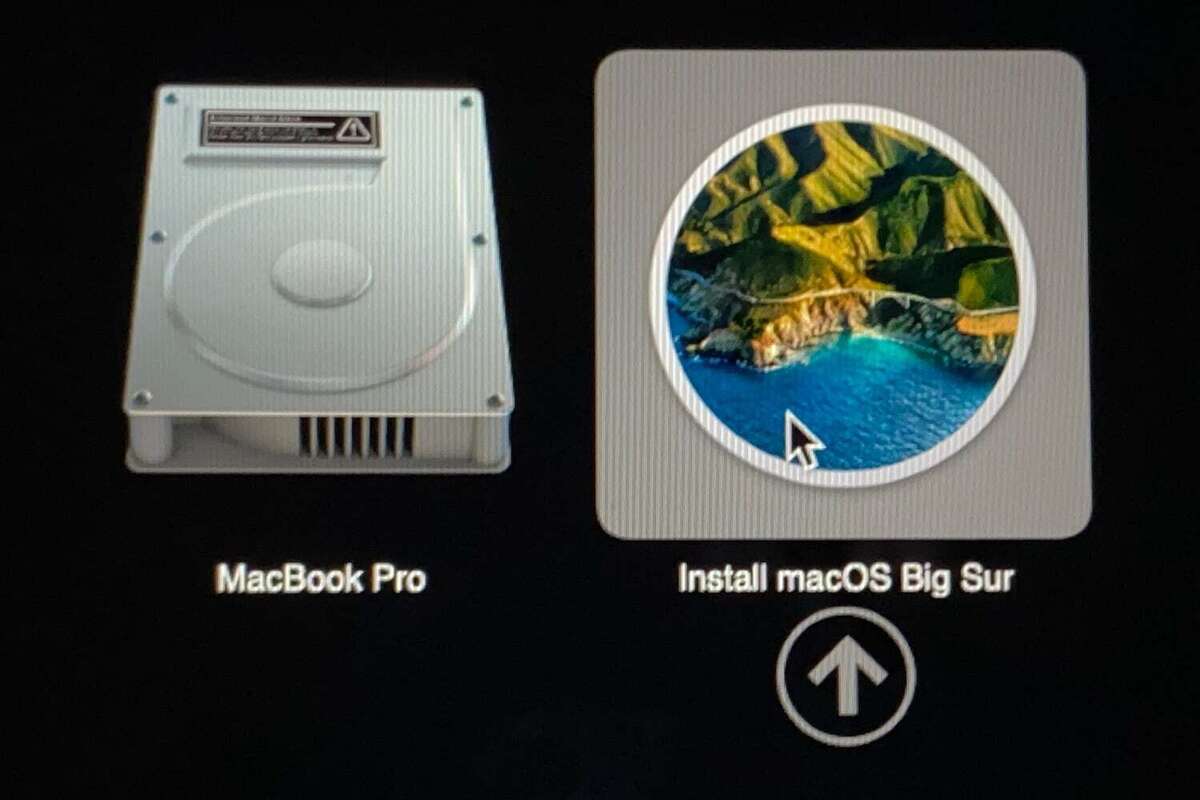
Apple silicon Macs (M-series)
- Shut down the Mac.
- Press and hold the power button until Startup Options appears.
- Select the macOS installer and click Continue.
Intel Macs
- Select the macOS installer from the boot menu.
- Shut down the Mac.
- Turn it on and immediately hold the Option (or Alt) key.
The version of macOS on the bootable drive should start to install on your Mac now. (If you want to do a clean install, which means wiping your Mac first, follow the instructions in How to do a clean install on a Mac.
Eventually, the Mac should restart. Wait while the update takes place and then enjoy your newly updated operating system.
You can also run the Mac operating system directly from an external drive rather than your built-in startup disk, this is handy if you are testing new versions of macOS. The process is different to the one described above though, and we cover it here: Read about How to run macOS on an external hard drive here.
Note that older versions of macOS used “applicationpath” while newer ones don’t – if you use the command you will get an error (we have the code for the all versions of macOS and Mac OS X below).
createinstallmedia commands
The createinstallmedia command will be slightly different depending on which version of macOS you are wanting to use.
Note MyVolume may have a different name for you, for example it might be USB or Untitled. Check in Disk Utilities, it’s the name of the external disk you are using.
- WARNING: We have heard of people copying and pasting in the
--only for them to change to a–in Terminal, so be careful of that. There should be two dashes!
Tahoe
sudo /Applications/Install macOS Tahoe.app/Contents/Resources/createinstallmedia --volume /Volumes/MyVolume
Sequoia
sudo /Applications/Install macOS Sequoia.app/Contents/Resources/createinstallmedia --volume /Volumes/MyVolume
Sequoia beta
sudo /Applications/Install macOS Sequoia beta.app/Contents/Resources/createinstallmedia --volume /Volumes/MyVolume --nointeraction
Sonoma
sudo /Applications/Install macOS Sonoma.app/Contents/Resources/createinstallmedia --volume /Volumes/MyVolume
Ventura
sudo /Applications/Install macOS Ventura.app/Contents/Resources/createinstallmedia --volume /Volumes/MyVolume
Monterey
sudo /Applications/Install macOS Monterey.app/Contents/Resources/createinstallmedia --volume /Volumes/MyVolume
Big Sur
sudo /Applications/Install macOS Big Sur.app/Contents/Resources/createinstallmedia --volume /Volumes/MyVolume
Catalina
sudo /Applications/Install macOS Catalina.app/Contents/Resources/createinstallmedia --volume /Volumes/MyVolume
Mojave
sudo /Applications/Install macOS Mojave.app/Contents/Resources/createinstallmedia --volume /Volumes/MyVolume
High Sierra
sudo /Applications/Install macOS High Sierra.app/Contents/Resources/createinstallmedia --volume /Volumes/MyVolume
Sierra
sudo /Applications/Install macOS Sierra.app/Contents/Resources/createinstallmedia --volume /Volumes/MyVolume --applicationpath /Applications/Install/ macOS/ Sierra.app
El Capitan
sudo /Applications/Install OS X El Capitan.app/Contents/Resources/createinstallmedia --volume /Volumes/MyVolume --applicationpath /Applications/Install OS X El Capitan.app
Yosemite
sudo /Applications/Install OS X Yosemite.app/Contents/Resources/createinstallmedia --volume /Volumes/MyVolume --applicationpath /Applications/Install OS X Yosemite.app
")

