
Upgrading macOS doesn’t always go as planned. A new release might slow down your Mac, break essential apps, introduce bugs, or simply change features you rely on. If you’re wishing you could go back to the version you had before, the good news is that you can downgrade macOS.
While reverting a macOS update is generally easier than downgrading an iOS update, it’s not as simple as installing macOS. It is a multi-step process that typically requires wipe your Mac’s internal drive, as Apple does not allow installing an older version of the operating system directly over a newer one.
Because you need to erase your Mac’s internal drive before you can reinstall an older version of the operating system, your data must be backed up first. The exact process depends on whether you’re using an Apple silicon or Intel Mac, and whether you created a backup before upgrading macOS.
In this guide, we run through the safest ways to revert to an earlier version of macOS, explain what works (and what doesn’t), and help you choose the best method for your situation.
Can I downgrade from macOS Tahoe to Sequoia?
Yes, it is possible to downgrade from macOS Tahoe (macOS 26) to macOS Sequoia (macOS 15), but the process is complex and requires you to completely wipe your Mac’s data and install the older version of macOS.
You need the following:
- A backup: You will have to wipe your Mac, so you need to have a backup of your data.
- The correct macOS version: You need to download the installer for the version of macOS you want to install.
- An external hard drive: You need to create a bootable installer of macOS.
Follow these steps, which we will run through in more detail below:
- Backup your Mac.
- Get the installer you want.
- Create a bootable installer.
- Shut down your Mac and restart in Recovery Mode.
- Set up your Mac using the bootable installer.
- Recover your backed up files.
Can I downgrade macOS 26.3 to macOS 26.2?

Foundry
Apple issues multiple point updates throughout the year and if something breaks on your Mac following that update you may want to go back to the previous version. This could be from macOS 26.3 to macOS 26.2, for example, but this applies to any subsequent update.
To just drop back from one version of Tahoe to another you will need access to the older macOS installer, which isn’t as simple as accessing the installers of the previous macOS, e.g. macOS Sequoia, which you can download from the Mac App Store.
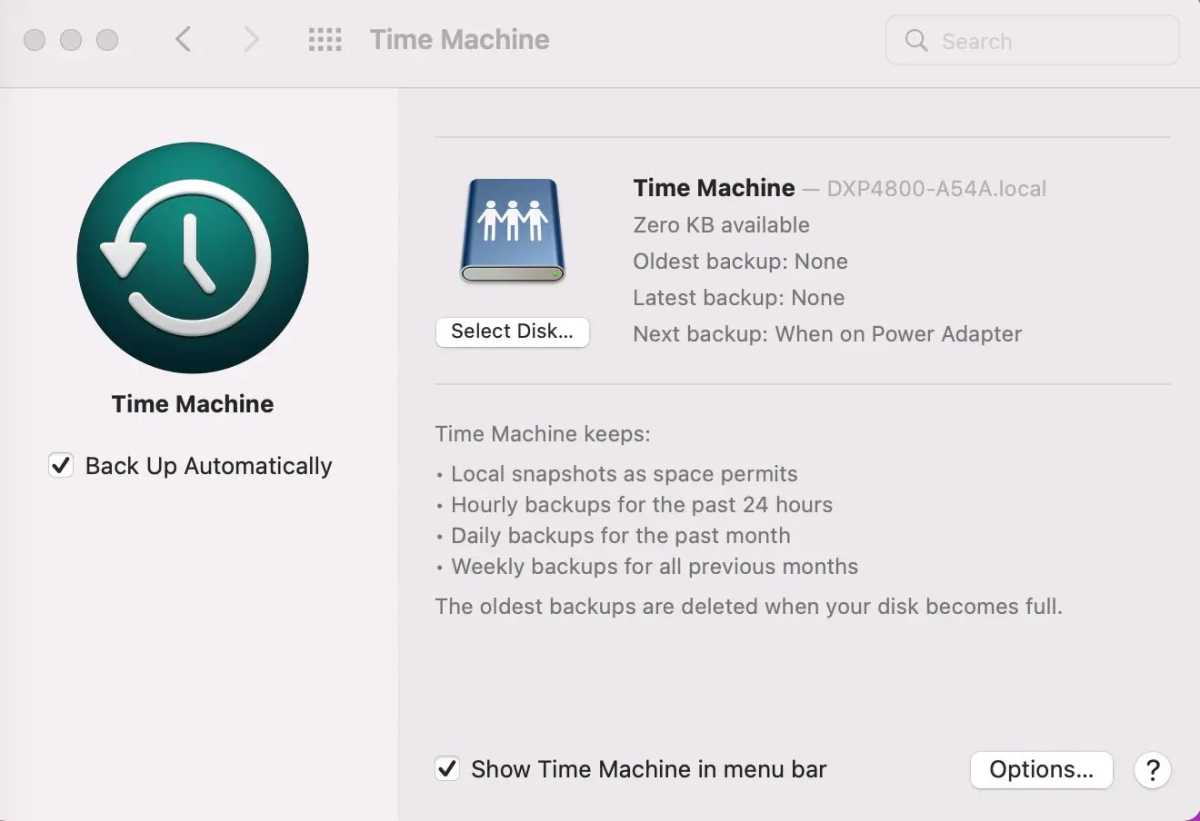
The simplest option here is to use a Time Machine backup made while you were running the previous version of macOS Tahoe, e.g. macOS 26.2. If you have access to this you can use that to recover the older version of Tahoe. You will lose any data you have added to your Mac since the update so make a separate backup of that.
We explain how to recover your Mac from a Time Machine backup separately.
Before you begin: Back up your Mac
- If you can access a backup made before you updated to the version of macOS you want to revert from, you can skip this step.
Backing up your Mac is the most critical step before a downgrade because the process typically requires wiping your drive, which erases all local data. If you don’t already have a back up of your data you will need to make one.
While Apple’s Time Machine backup software is the standard for most updates, it presents a specific challenge for downgrades: if you back up your current (newer) OS, restoring from that backup may simply reinstall the version you are trying to remove.
To ensure your data is safe and accessible after you return to an older version of macOS, consider these strategies:
- Manual File Copying: The simplest way to ensure data safety is to manually copy your most important files, folders, photos, and music to an external storage drive.
- Third-Party Cloning Software: Tools for backing up a Mac, like ChronoSync, Get Backup Pro, SuperDuper, or Carbon Copy Cloner can create a clone of your drive. These solutions are often preferred for downgrades because they allow you to back up your data without necessarily including the operating system.
- Cloud Synchronization: Ensure services like iCloud, Dropbox, OneDrive, or Google Drive are fully synchronized before starting. However, be cautious, you should not assume every app’s data is in the cloud, as some non-Apple applications may store data only locally. See our Best cloud storage for Mac round up for recommendations.
- Bootable Backups: Some advanced suites, such as Acronis True Image, offer a “Survival Kit” that creates a bootable backup drive to help reinstall an OS and recover data simultaneously.
- Time Machine: On the other hand, if you have a Time Machine backup from before you upgraded macOS you can use that to recover your data.
For more help read: How to back up a Mac.
How to downgrade macOS
The steps below will help you revert to an older version of macOS. Before you start you need to wipe your Mac and do a clean install of the macOS you want. We’ll explain how to wipe your Mac, how to get the older version of macOS, and how to install it below.
- Reminder: This will erase your Mac, so do make sure you have a backup of important files.
Foundry
Get the installer
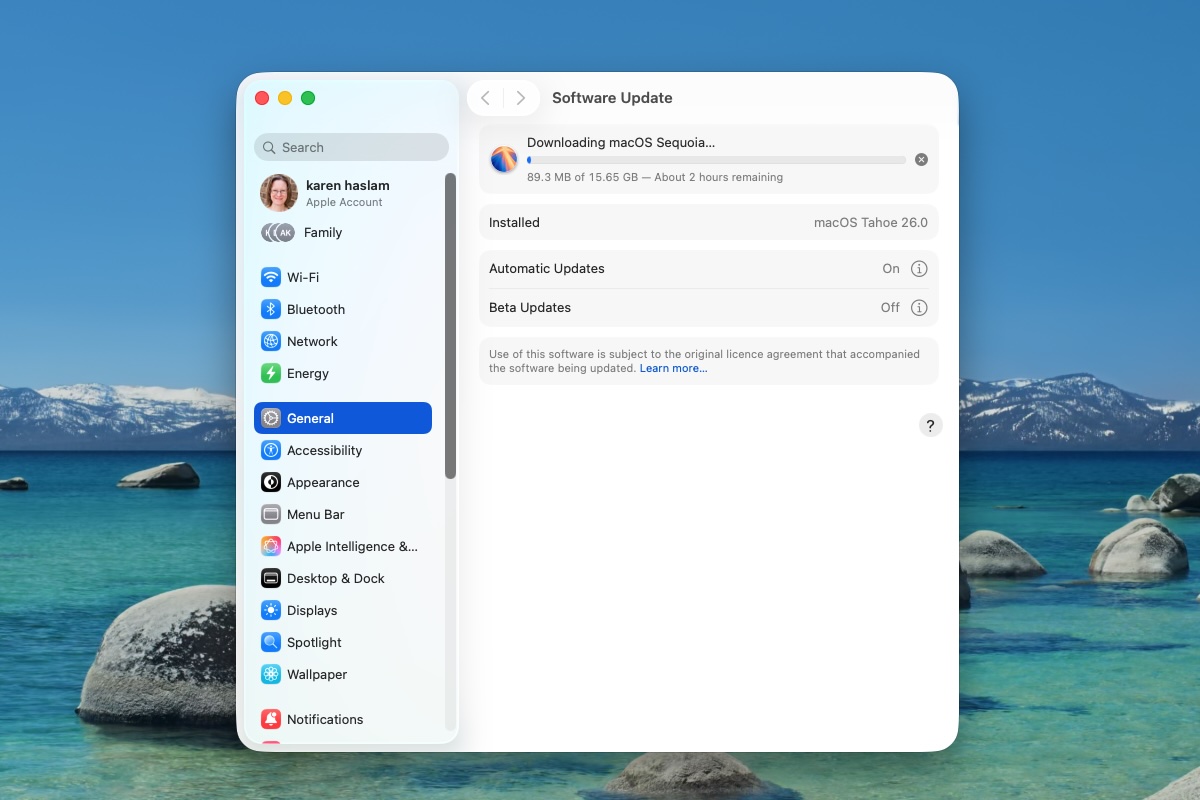
Downloading Sequoia despite running macOS Tahoe.
Foundry
The first stage of this method is to get the installer for the version of macOS you require, with the prerequisite that your Mac needs to be able to run it. See: macOS compatibility–the versions your Mac can run.
We have links to some recent versions of macOS below so you can download the one you want.
- To start you need to grab the installer of whichever version of macOS you want to install from the Mac App Store using the links above. If you want an older version see this article: How to download old versions of macOS. When you click the link above it should take you directly to the Mac App Store, if that doesn’t happen close the Mac App Store if it is open and make sure you are using Safari.
- Click on Get.
- The Software Update window will open and you should see a pop-up overlaying it with the version you want to download. Click on Download and confirm that you want to download the software (you’ll also see a warning that you are downloading an older version of the OS, ignore it.)
- Once it’s downloaded DO NOT click on Open – you don’t want to install it yet.
Create a bootable installer
Foundry
You won’t just be able to install Sequoia over Tahoe, or any old version of macOS over a newer one. In order to install an older version of macOS on your Mac you have to make a bootable installer that includes the installation files.
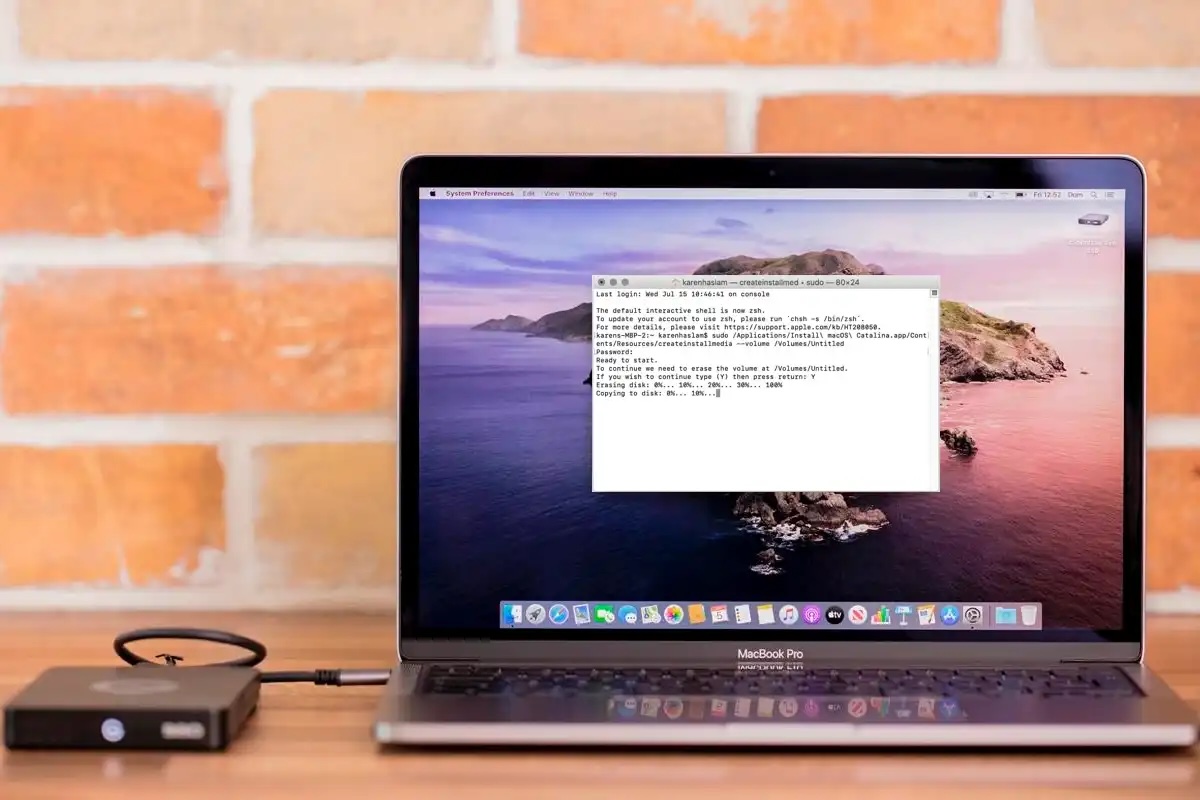
To make a bootable installer, from which you can reinstall the older macOS, you will need a memory stick with at least 15GB space but we’d recommend more. You’ll need to reformat that drive and prepare it in Disk Utility and then use Terminal to input the createinstallmedia command for the version of macOS you are installing.
In the case of Sequoia this is:
(NOTE: Before the word volume you need two dashes, but the website is converting this to an M-dash, we have pasted the correct text further down the article, you can also find it here: How to create a bootable installer of macOS).
sudo /Applications/Install macOS Sequoia.app/Contents/Resources/createinstallmedia –volume /Volumes/MyVolume
In the case of Sonoma this is:
sudo /Applications/Install macOS Sonoma.app/Contents/Resources/createinstallmedia –volume /Volumes/MyVolume
You will need to replace MyVolume with the name you have given to the drive you are using as the bootable installer.
We recommend that you follow the steps outlined in this article: How to create a bootable installer of macOS to create your bootable installer. You will find all the createinstallmedia commands in that article.
Use the bootable installer to downgrade your Mac
Foundry
Now you have your bootable installer you should be able to install the older version of macOS on your Mac using it.
- Connect the bootable installer to your Mac.
- Open System Settings and click General > Startup Disk.
- Choose the external drive with your installer as the startup disk and click Restart.
- Your Mac will shut down and restart in Recovery mode.
- You will need to connect to Wi-Fi because your Mac will need to connect to the internet during this process. Access Wi-Fi settings from the Wi-Fi menu.
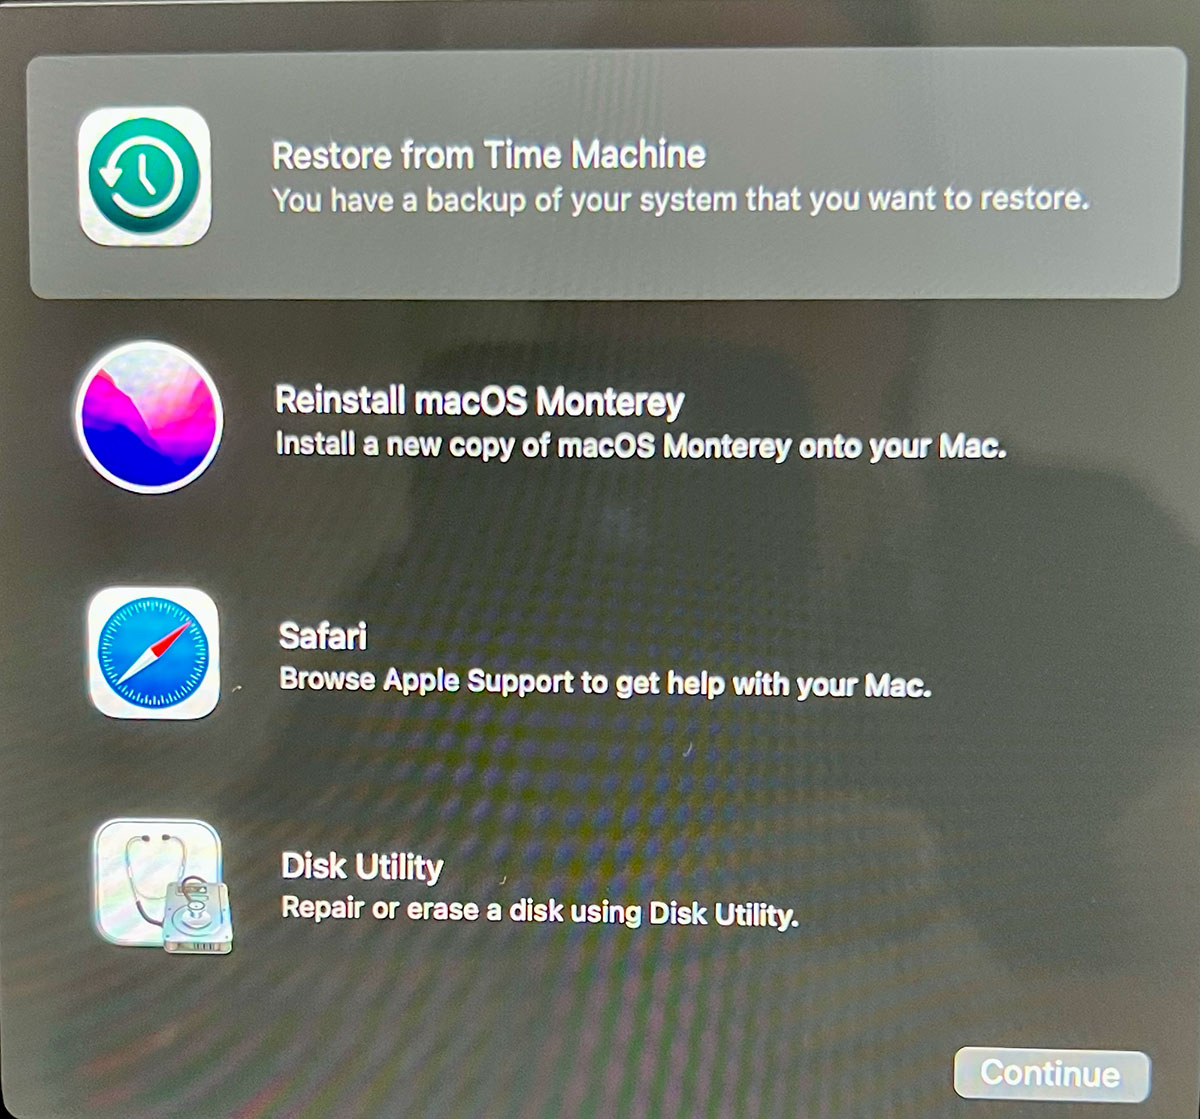
- Select Reinstall macOS from Utilities.
- Click Continue.
Set up your Mac
Foundry
Now that you have wiped your Mac and installed the version of macOS you wanted you will need to run through the set-up process. See How to set up a new Mac for help with that.
If you have a Time Machine backup from before the update then go to the next step for help recovering that backup.
Alternatively, finish setting up your Mac as new and recover the data you backed up using an alternative backup method to Time Machine.
Recover your Time Machine Back up from before the update (if you have one)
Ugreen
If you have an older Time Machine backup from before you upgraded the downgrade process is relatively easy. With your pre-Tahoe Time Machine backup in hand, you can recover your machine from before the update.
Just remember that anything you have done since then will be lost because you’ll wipe everything on your Mac as part of the process, so you will need to make a non-Time Machine backup of those files. You can then copy back any files you created after you installed the new macOS.
- As described above, wipe your Mac and install macOS Sequoia.
- Plug your Time Machine disk into your Mac.
- Restart your Mac.
- On an M1 or later Mac you need to press and hold the power button until the Options menu comes up. (For older Intel Macs hold down Command + R until the Apple logo appears.)
- When the options appear on the screen, choose ‘Restore From Time Machine Backup’ and click Continue.
- The next screen will show the words Restore from Time Machine, click Continue again.
- Next, select your Restore Source – this should be your backup drive.
- The next screen shows all your backups over time, pick the last one you made prior to updating to the newer version of the Mac operating system. (You can see which version of macOS the back up was made in).
Creating a bootable installer
When it comes to creating the bootable installer you will need the following code:
Code required for Sequoia:
sudo /Applications/Install macOS Sequoia.app/Contents/Resources/createinstallmedia --volume /Volumes/MyVolumeCode required for Sonoma:
sudo /Applications/Install macOS Sonoma.app/Contents/Resources/createinstallmedia --volume /Volumes/MyVolumeTroubleshooting downgrade issues
These things don’t always go smoothly. Here are a few issues you might encounter:
Wiping an older Mac
If your Mac is old and isn’t running Monterey or later, you will need to erase your Mac following the steps in our tutorial on wiping a MacBook or Mac. We recommend that you follow that tutorial as there are a lot of steps you should take to ensure that you don’t create more problems for yourself.
What to do if booting from external media doesn’t work
If you are using a Mac with a T2 Chip then you need to ensure that you enable booting from external media or this will not work. To do this you need to access Recovery Mode and then choose Startup Security Utility from the menu. Here you will see a number of options including those for Secure Boot and those for Allowed Boot Media. It is in this second section that you will find Allow booting from external or removable media. You will need this selected to boot from a bootable drive.
What to do if the old macOS won’t install
If the above doesn’t work you may need to completely wipe your Mac before reinstalling macOS from the bootable drive.
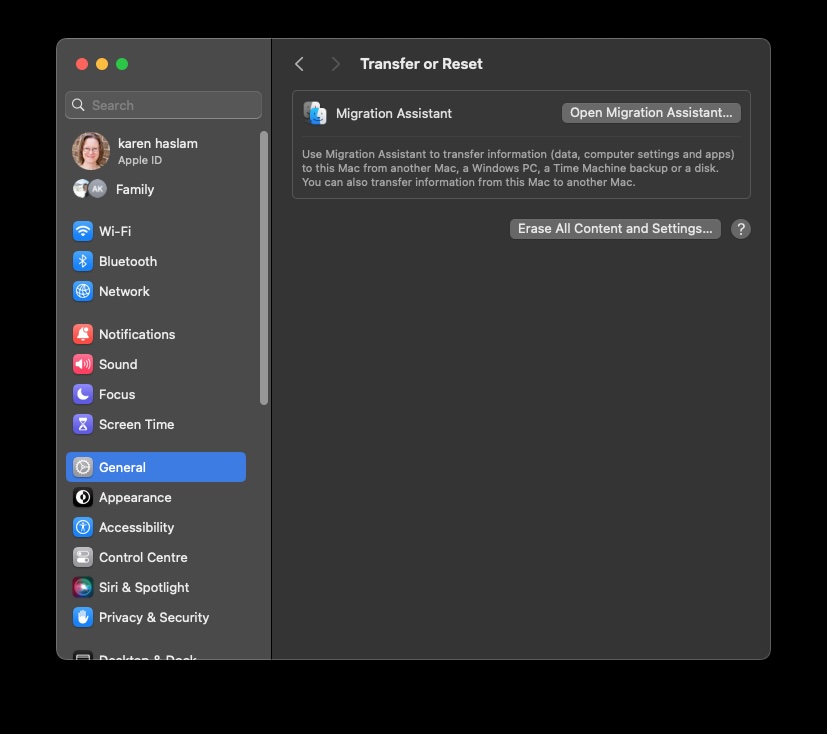
We explain in detail how to erase a Mac in this article: How to erase a MacBook or Mac: restore to factory settings and we advise that you follow that tutorial. If you have a Mac with T2 chip, or an M-series Mac erasing your Mac is very simple thanks to the Erase All Content And Settings option. This setting used to be found in the menu of System Preferences but with the arrival of System Settings it’s now located in System Settings > General> Transfer or Reset.
Foundry
Reinstalling an older macOS via Recovery mode
Depending on the age of your Mac there might be an option to recover the original version of macOS it shipped with using macOS Recovery.
You won’t be able to revert to something older than the macOS your Mac shipped with.
Follow these steps to reinstall the version of macOS your Mac came with, or one that is close to that:
- Turn off your Mac.
- For Intel-powered Macs, restart it while holding down Shift + Option/Alt + Command + R to enter Internet Recovery Mode (make sure you are connected to the internet).
- Choose the Reinstall macOS option.
- Click Install.
This may allow you to install the operating system that your Mac shipped with. Unfortunately, when we tried this method we were unable to recover an older version of macOS, it seems that it works only for some Macs.
Tips to avoid problems and data loss when you downgrade macOS
Reversing an upgrade carries with it a number of wrinkles and pitfalls.
Most of these are due to changes in file formats and settings between versions of the OS. So, for example, if you create a document or work on a file in a new version, whether it’s a beta or full release, of macOS and then try and open it in an older version, it may not work.
To mitigate this, it’s wise to export any documents you’ve created or worked on in the newer OS in a standard file format. So, for example, you could export documents as RTF files. That way, if the native files don’t survive the reverse upgrade, you’ll be able to re-import the RTF files.
Take screenshots of preferences and settings
Whenever you perform a clean install of macOS, which is what you’re doing here, it’s a good idea to take screenshots of any custom settings you’ve created in apps or in System Settings (or System Preferences on older Macs). That makes it easier to re-create them later.
You should also make a note of user account and password details for anything you’ve set up while running the new version of the OS. If you don’t use iCloud or Chrome to synchronise bookmarks, it’s a good idea to export those and make a copy.
And unless you’re using the migrate data option outlined above, you’ll also need installers and license codes for apps you use. If those are downloads from the Mac App Store, you can just re-download them from the Purchased section in the App Store. If not, make sure you can download them from the vendor’s website. If you don’t use a password manager to store license codes, make sure you’ve got a copy of them before you start.
Synchronize
If you use Dropbox, OneDrive, Google Drive or any other form of cloud storage, make sure your data is in sync before you start the process of reversing an upgrade. It’s easy to forget that the files that live in your Dropbox folder, for example, are local files and that while synchronization is frequent, the loss of an internet connection will prevent it and you could have files in your local folder that haven’t yet been copied to the cloud.
Clicking on the cloud service’s logo in your menu bar should tell you whether synchronization completed successfully and files are up to date.
If you use Gmail, iCloud mail or any other IMAP server for your email, make sure it’s up to date and any drafts you’ve composed recently have been synchronized. If you use a POP3 account you’ll have to manually back up the mail database and restore it after you reverse the upgrade. Or, if you only have a few messages you need to keep, forward them to a Gmail account – you could set one up especially for that purpose.
")

